4.4 KiB
N2T
This repository contains my solutions for Nand to Tetris. N2T is a course that teaches how to build a fully functioning general-purpose computer from first principles. It starts with the hardware design, including its own instruction set for which you program an assembler. You finish the course with a two-step compiler that translates a high-level programming language called Jack into assembly code.
Even though I have a solid understanding of microcontrollers based on my experience in the embedded industry, I still learned a couple of new concepts and improved my general knowledge of how a computer works. Going through all the steps to build a computer starting from first principles helps to facilitate a deep understanding. If you are a person that needs hands-on examples to grasp a concept, you will love this course as much as I do.
In the following, I explain how to use my solutions, mainly if I want to revisit this class later. If you haven't done the course yet, you should not look at the answers, but you can try to play the game I wrote in the Jack programming language. It is not a game but a 1D cellular automaton simulator.
Project 1: Boolean Logic
In this project, we start building the basic gates required for the computer.
Our basic building block is a Nand gate from which we make 15 additional gates.
We implement the gates in a simplified hardware description language (HDL). To
test the HDL files, run ./tools/HardwareSimulator.sh and open one of the test
scripts located in ./projects/01.
Project 2: Boolean Arithmetic
Based on the previous projects' basic gates, we build arithmetic chips: a half-adder, a full adder, a 16-bit adder, and a 16-bit incrementer based on the simple adders. Finally, we create the ALU (arithmetic-logic unit), which is the heart of the CPU that we make in the later projects. The ALU takes two 16-bit inputs and computes an output depending on a couple of control-bits' status. To test the arithmetic chips, use the hardware simulator equally to the first project.
Project 3: Memory
Till this point, all gates are stateless. To build a computer, we need memory. For this purpose, the course introduces a DFF (data flip-flop). We can create a one-bit register and build up from there to a 16k chip with the DFF.
It found it rewarding to build memory from first principles, but even more rewarding was how easy Vim makes it to write the HDL code for these chips. The following picture shows how I create a 64-bit register from 8-bit registers in a matter of seconds.

Project 4: Machine Language Programming
In project 4, we get familiar with the Hack machine language - our
computer's assembly language. We write two basic projects: fill the
screen when the user presses a button, and a second one that
multiplicates two input arguments. To try the scripts, start the CPU
emulator by executing ./tools/CPUEmulator.sh. You can then open the
script located in ./projects/04/fill or ./projects/04/mult.
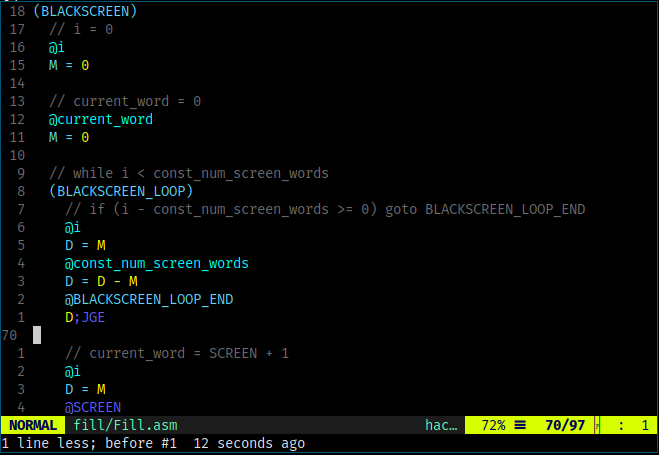
I have created a Vim syntax file for the Hack assembly language. Copy the file
hackasm from the vim directory into your Vim installation's syntax
directory. You can then set the filetype to hackasm by running :set ft=hackasm
from within Vim, and you should see highlighting as shown on the following
screenshot.
Project 5: Computer Architecture
In this project, we assemble all prior building blocks into the main memory, CPU, and finally into the full hack computer. There are test scripts similar to project one to three to validate that the computer works as designed. Seeing it all come together is incredibly rewarding. Even if you stop the course at this point, you have developed a great intuition of how a computer works.
Project 6: The Assembler
With the computer working, we now need a way to assemble the hackasm code into machine instructions. The purpose of this project is to build the assembler in the programming language of our choice.
My Python version has 203 lines of code and relies on Python 3.8 features. We
can test the assembler by changing the directory to ./projects/06 and then
running python assembler.py pong/*.asm. Note that my assembler can only
translate individual asm-files and does not search a directory.
Load the resulting hack file into the CPU emulator to verify that the assembler works correctly.