| gifs | ||
| jack_analyzer | ||
| jack_compiler | ||
| projects | ||
| tools | ||
| vim | ||
| vm_translator | ||
| .gitignore | ||
| LICENSE | ||
| README.md | ||
N2T
This repository contains my solutions for Nand to Tetris. N2T is a course that teaches how to build a fully functioning general-purpose computer from first principles. It starts with the hardware design, including its own instruction set for which you program an assembler. You finish the course with a two-step compiler that translates a high-level programming language called Jack into assembly code.
Even though I have a solid understanding of microcontrollers based on my experience in the embedded industry, I still learned a couple of new concepts and improved my general knowledge of how a computer works. Going through all the steps to build a computer starting from first principles helps to facilitate a deep understanding. If you are a person that needs hands-on examples to grasp a concept, you will love this course as much as I do.
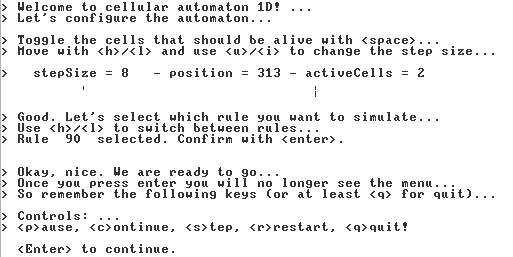
In the following, I explain how to use my solutions, mainly if I want to revisit this class later. If you haven't done the course yet, you should not look at the answers, but you can try to play the game I wrote in the Jack programming language. It is not a game but a 1D cellular automaton simulator.
Project 1: Boolean Logic
In this project, we start building the basic gates required for the computer.
Our basic building block is a Nand gate from which we make 15 additional gates.
We implement the gates in a simplified hardware description language (HDL). To
test the HDL files, run ./tools/HardwareSimulator.sh and open one of the test
scripts located in ./projects/01.
Project 2: Boolean Arithmetic
Based on the previous projects' basic gates, we build arithmetic chips: a half-adder, a full adder, a 16-bit adder, and a 16-bit incrementer based on the simple adders. Finally, we create the ALU (arithmetic-logic unit), which is the heart of the CPU that we make in the later projects. The ALU takes two 16-bit inputs and computes an output depending on a couple of control-bits' status. To test the arithmetic chips, use the hardware simulator equally to the first project.
Project 3: Memory
Till this point, all gates are stateless. To build a computer, we need memory. For this purpose, the course introduces a DFF (data flip-flop). We can create a one-bit register and build up from there to a 16k chip with the DFF.
It found it rewarding to build memory from first principles, but even more rewarding was how easy Vim makes it to write the HDL code for these chips. The following picture shows how I create a 64-bit register from 8-bit registers in a matter of seconds.
Project 4: Machine Language Programming
In project 4, we get familiar with the Hack machine language - our
computer's assembly language. We write two basic projects: fill the
screen when the user presses a button, and a second one that
multiplicates two input arguments. To try the scripts, start the CPU
emulator by executing ./tools/CPUEmulator.sh. You can then open the
script located in ./projects/04/fill or ./projects/04/mult.
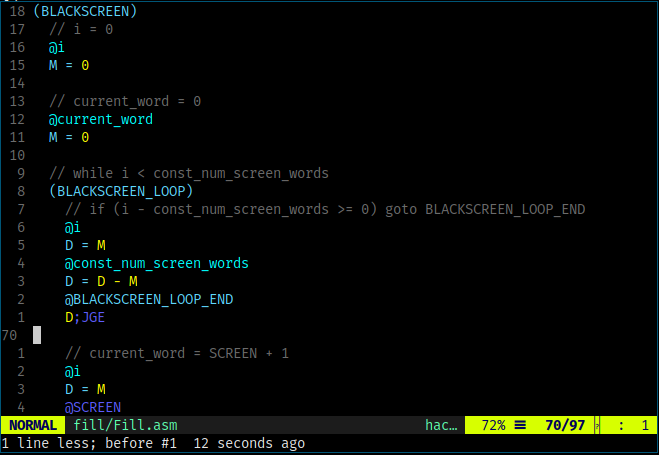
I have created a Vim syntax file for the Hack assembly language. Copy the file
hackasm from the vim directory into your Vim installation's syntax
directory. You can then set the filetype to hackasm by running :set ft=hackasm
from within Vim, and you should see highlighting as shown on the following
screenshot.
Project 5: Computer Architecture
In this project, we assemble all prior building blocks into the main memory, CPU, and finally into the full hack computer. There are test scripts similar to project one to three to validate that the computer works as designed. Seeing it all come together is incredibly rewarding. Even if you stop the course at this point, you have developed a great intuition of how a computer works.
Project 6: The Assembler
With the computer working, we now need a way to assemble the hackasm code into machine instructions. The purpose of this project is to build the assembler in the programming language of our choice.
My Python version has 203 lines of code and relies on Python 3.8 features. We
can test the assembler by changing the directory to ./projects/06 and then
running python assembler.py pong/*.asm. Note that my assembler can only
translate individual asm-files and does not search a directory.
Load the resulting hack file into the CPU emulator to verify that the assembler works correctly.
Project 7/8: VM Translator
At this point, we have finished the hardware part of our computer and can program it via the Hack assembly language. Of course, a higher-level programming language is desirable to write programs more comfortably. Therefore, our goal is to implement the high-level programming language Jack and compile it down into Hack assembly.
We use a two-step compilation process. First, we translate the Jack code into VM code, which we then translate further into Hack assembly. The goal of projects 7 and 8 is to implement the VM translator in a programming language of our choice. Even though Python is my primary language, and I would have been faster using it, I decided to opt for Rust, a language that I hadn't used before. Rust comes with a flourishing eco-system and static typing that came in handy for this project.
My VM translator ended up with just under 900 lines of code. A considerable part of that is the template Hack assembly code that the translator fills with registers and addresses. I would have opted for the Jinja2 templating language in Python, but instead, I used in-code strings combined with "format!". While this looks ugly at times, it avoids external dependencies. The approach is okay for this course, but a template engine would have been desirable for a real-world project.
To run the VM translator, switch into the ./vm_translator directory and
execute cargo build. You can then execute
./vm_translator/target/debug/vm_translator on one of the example projects in
./projects/08.
I was happy with my choice to learn Rust even though I spent too much time figuring out trivial things like how to read a file.
Project 9: High-Level Language
With the VM translator in place, it is now time to understand the high-level
Jack languaged by implementing a project. I decided to implement a 1D cellular
automation in ./projects/09/CellAutomaton1D. To run the program first compile
the project by running ./tool/JackCompiler.sh ./projects/09/CellAutomaton1D.
Then, start the Virtual Machine Emulator and open the project. Make sure to
select the directory CellAutomaton1D and not one of the VM files.
The program consists of two parts. First, you configure the initial population using Vim key bindings, and then the program simulates the selected rule. You have the option to pause and single step the simulation.
I have also implemented Vim syntax highlighting for the jack programming language. The best thing is that Vim yells at you when you forgot one of the keywords, like let or do. And you will forget them all the time. Simple put jack.vim into your Vim's syntax directory, and you should be good to go.
Project 10/11: Compiler
With a solid understanding of the Jack programming language, we are now ready to
implement the compiler. I opted for Rust again and had a great time. The
directory jack_analyzer contains the tokenizer and parser, which outputs an
XML syntax tree. In project 11, we use the analyzer to generate VM code. The
resulting Rust project is in the directory jack_compiler. To compile the
project, change into the directory and execute cargo build.
You can now recompile the cellular automaton by running the following command:
./jack_compiler/target/debug/jack_compiler projects/09/CellAutomaton1D
I honestly was happy with my decision to opt for Rust again. While the project would undoubtedly have been manageable in Python, static typing made it so much easier to cover all cases for keywords and tokens. The compiler has a little over 1000 lines of code. That sounds pretty decent.
Project 12: The Operating System
With the compiler in place, the last step is implementing the OS functionality that previously came from the Virtual Machine Emulator. In particular, there is a library for string handling, memory management, array handling, math (multiplication and division), and display routines to draw characters and geometric forms.
I particularly enjoy seeing how much effort goes into simple routines like multiplication and division. Of course, as a high-level programmer, you take these operations for granted but getting into the details of how to implement them is rewarding. I still learned a lot, even for this last project.
Conclusion
Nand to Tetris is one of my favorite classes of all time. I highly recommend it to everybody who works in computer science and feels like they only partially understand how a computer works. I certainly got many new insights throughout the course, and I learned a new programming language, Rust, which I should use more often over Python.


